AKIYAMA TTWO
 for VirtualDJ 8.0+ Last Update : September 2016
SETUP
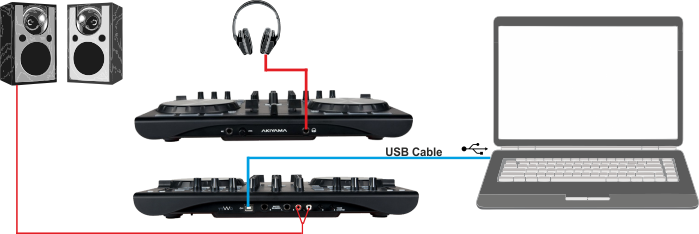
Step 1. Connections
- Connect the Akiyama Ttwo to a USB port of your computer using the provided USB cable.
- Connect your Headphones to the front socket of the unit and your amplifier/amplified speakers to the Master Out socket at the rear side using TRS or RCA cables.
Step 2. Drivers
Windows only : Install the Akiyama ASIO drivers from
http://www.akiyamadj.com/akiyama+ttwo+2+channels+midi+controller-p-TTWO.html?cPath=115_117No drivers is required to be installed for Mac OSX computers
Step 3. VirtualDJ Setup
Download and install VirtualDJ 8 from http://www.virtualdj.com/download/index.html (in case you have not done already)
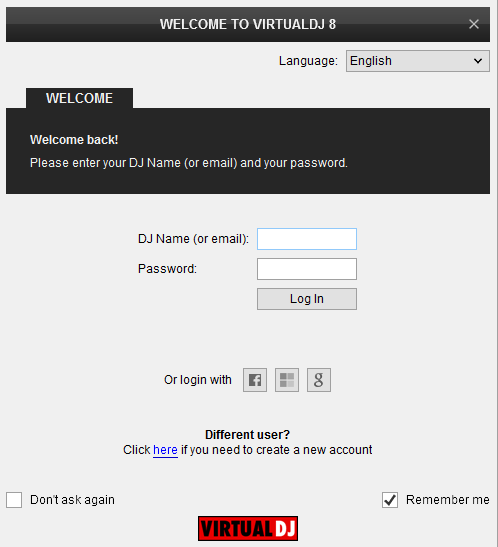
Once VirtualDJ 8 is opened, a Login Window will appear. Login with your virtualdj.com account credentials.
A Pro Infinity, a Plus Controller or a Subscription License is required to use the Akiyama Ttwo. Without any of the above Licenses, the controller will operate for 10 minutes each time you restart VirtualDJ 8.
http://www.virtualdj.com/buy/index.html
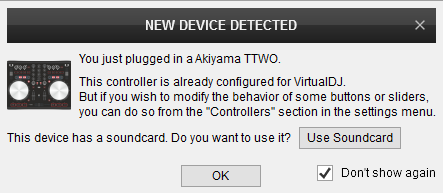
 Detection WindowA detection window will appear when the unit is first connected with VirtualDJ, verifying proper detection.
Click to “Use Soundcard”. VirtualDJ will automatically create the necessary audio configuration. Speakers need to be connected to the rear side of the unit in this case.
Click to OK
The unit is now
ready to operate with VirtualDJ
CONTROLS
KEY
ACTION
SHIFT (SECONDARY) ACTION
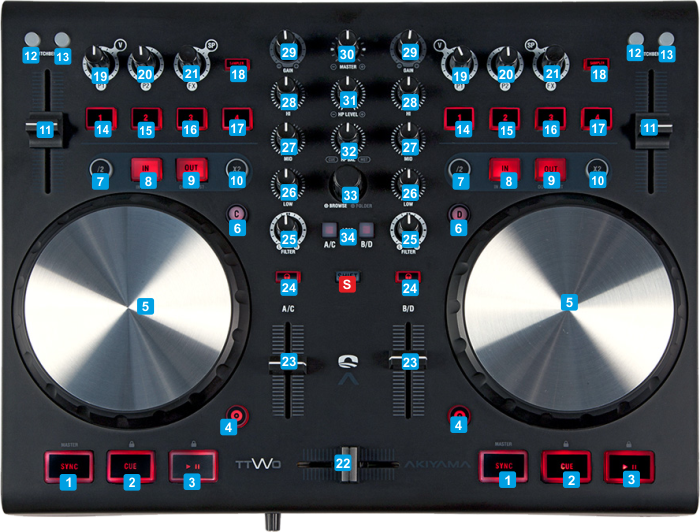
S SHIFTPress this button down to access secondary actions as described in the SHIFT ACTION column 1 SYNCSync Tempo and Phase with the Master DeckSet deck as Master Deck 2 CUE Set temporary Cue point or return to Cue and preview while pressedEnables/disables Smart Cue 3 PLAYPlay/Pause trackEnables/disables Smart Play4 SCRATCHSets Jog to Scratch (Vinyl) mode when enabled or CD (Bend) mode when disabled
Hold for more than 2 seconds to enable/disable Smart LoopEnables/disables Master Tempo (Keylock). When enabled, the key of the track will remain intact when Tempo is changed5 JOGTouch-sensitive platter for scratch or bend, depending on the Vinyl mode
When Loop In Adjust mode is enabled, use the Jogwheel to fine-adjust the Loop In (Start) point of a manual loop
When Loop Out Adjust mode is enabled, use the Jogwheel to fine-adjust the Loop In (Start) point of a manual loopFast search (seek) through track's time 6 DECK C/DAssign left/right side of controller to Decks 1/2 or 3/4 respectively 7 LOOP /2Halves the size of the LoopWhen loop is enabled, moves the loop backwards in time by the amount of beats equal to the size of the triggered loop 8 LOOP INSets the current track's position as Loop In (Start) point of a manual loopWhen loop is enabled, sets the Jogwheel to Loop In Adjust mode.(LED will blink)8 LOOP OUTSets the current track's position as Loop Out (End) point of a manual loop. Use the same button again to exit the LoopWhen loop is enabled, sets the Jogwheel to Loop Out Adjust mode.(LED will blink)10 LOOP X2Doubles the size of the LoopWhen loop is enabled, moves the loop forward in time by the amount of beats equal to the size of the triggered loop 11 PITCHAdjust track's tempo 12 PITCHBEND -Temporary slow-down track's tempo while button is pressed. When released, tempo will return to the value designated by the Pitch fader.Links all Tempo faders from all decks so that they all move together13 PITCHBEND +Temporary speed-up track's tempo while button is pressed. When released, tempo will return to the value designated by the Pitch fader.Smoothly reset Tempo to the original value (zero/middle)14 HOTCUE 1Assigns or triggers (if assigned) Hotcue 1Deletes Hotcue 115 HOTCUE 2Assigns or triggers (if assigned) Hotcue 2Deletes Hotcue 216 HOTCUE 3Assigns or triggers (if assigned) Hotcue 3Deletes Hotcue 317 HOTCUE 4Assigns or triggers (if assigned) Hotcue 4Deletes Hotcue 418 FX/SAMPLESets the top 3 FX/SP knobs to either FX (when disabled) or Sampler mode (when enabled) 19 P1/VIn FX mode : Adjusts the 1st Parameter of the selected Effect
In Sampler mode : Adjusts the Volume of the selected Sample
In Video mode : Left knob adjusts the 1st Parameter of the selected Video Transition (if available)
Right knob adjusts the 1st Parameter of the selected Master Video Effect (if available) 20 P2In FX mode : Adjusts the 2nd Parameter of the selected Effect
In Sampler mode : no function
In Video mode : Left knob adjusts the 2nd Parameter of the selected Video Transition (if available)
Right knob adjusts the 2nd Parameter of the selected Master Video Effect (if available) 21 FX/SPIn FX mode : Select the previous/next available Effect
In Sampler mode : Selects the next/previous Sample from the selected Sampler Bank
In Video mode : Left knob selects the previous/next available Video Transition
Right knob selects the previous/next Master Video Effect
Push for more than 2 seconds to enable/disable Video mode
In FX mode : Push to enable/disable the selected Effect
In Sampler mode : Push to trigger the selected Sample
In Video mode : Push left knob to trigger the selected Video Transition and the right knob to trigger the selected Master Video EffectIn Sampler mode : Half/double the Loop of the selected Sample
In Sampler mode : Push to record deck to a new Sample
22 CROSSFADERBlends audio signals between the left and right assigned decks 23 VOLUMEAdjust the Volume of the Left/Right assigned Deck 24 PFLSends the audio signal of the Left/Right assigned Deck to the Headphones channel (for pre-listening) 25 FILTERApplies a High/Low-Pass Filter to the Left/Right assigned Deck Adjusts the Key of the track loaded to the Left/Right assigned Deck26 EQ LOWAdjusts the Low (Bass) Equalizer Band of the Left/Right assigned Deck 27 EQ MIDAdjusts the Middle Equalizer Band of the Left/Right assigned Deck 28 EQ HIAdjusts the High (Treble) Equalizer Band of the Left/Right assigned Deck 29GAINAdjusts pre-fader output level of the Left/Right assigned Deck 30MASTERAdjusts the level of the Master Output Channel 31HP LEVELAdjusts the level of the Headphones Output Channel 32HP MIXBlends audio signal between the Master Output (when in maximum position) and the Decks that have been selected via the PFL buttons (when in minimum position). 33BROWSEScrolls through tracks or folders
When focus is on Folders List, push to set focus to the Songs List (if the folder contains any tracks) or to the next (sub)folder (if the folder doesnt have any tracks)Scrolls through Folders
If focus is on the Folders list, push to open/close sub-folders
If focus is on the Songs List, push to add the selected track to the Automix List of Sideview
34 LOADLoad the selected track from the Browser to the Left/Right assigned Deck
Hold for more than 2 seconds to unload the same Deck
In Video mode :
Left LOAD button: Move Video Crossfader to the Left side. Hold for more than 2 seconds to enable/disable Auto Video Crossfader.
Right LOAD button : Move Video Crossfader to the Right side. Hold for more than 2 seconds to enable/disable Link Video Crossfader
FRONT & REAR PANELS
 Akiyama Ttwo Front Panel
 KEY
Operation
35 MIC INPUTConnect a Microphone via the 1/4" socket36 MIC LEVELAdjust the Level of the Microphone Input37 HEADPHONESConnect your Headphones to either the 1/4" socket. The Level of the Headphones Channel is controlled by the knob at the top panel  Akiyama Ttwo Rear Panel 38 USBConnect the unit to a USB port of your computer using the provided USB cable39 MASTER OUT TRSConnect your amplifier (speakers) to this balanced Output using TRS 1/4" cables. The level of this output is controlled by the Master knob at the top panel of the unit40 MASTER OUT RCAConnect your amplifier (speakers) to this unbalanced Output using standard RCA cables. The level of this output is controlled by the Master knob at the top panel of the unit41 TOUCH SENSORAdjust the touch sensitivity of the Left/Right Jogwheel
For further Technical features and specifications, visit Akiyama TTWO
Product's Page
 Hardware Integration Department 2016 - ATOMIX PRODUCTIONS Reproduction of this manual in full or in part without written permission from Atomix Productions is prohibited.